
Do you know how many people in the world just LOVE Little Debbie Snacks? My favorite as a kid was the Strawberry Jelly Roll. I had a boyfriend in college who could eat Christmas Tree Cakes morning, noon and night (and he sang a little song that went with his method of eating them branch by branch). Our favorite older backyard neighbors would slyly slip us treats of Nutty Bars when we raked their leaves. And who doesn't love a Swiss Cake Roll? Deb's motto is "Unwrap a Smile". I cannot argue with such a positive slogan about the power of baked goods.

But I've got a score to settle with Debbie.
Before I was actually aware of "high fructose corn syrup" or other red dye #42-type ingredients, I never had a problem eating one of those big marshmallow coconut Snowballs, or an Oatmeal Creme Pie, or a Ding-Dong for crying out loud! Those things were GOOD. But now we are all more conscious about the risks of putting preservative-laced, mass-produced packaged foods in our mouths. I understand that those ingredients are necessary for any type of factory-made, processed snack that has to travel umpteen miles from the factory floor to your grocery shelf. It isn't her fault. But in the process Little Debbie loses a lot of of innocence.
Still, I love the all-American image she represents. So why not recreate Little Debbie at home where I can control what goes into the dessert?
 I decided to start with the iconic Chocolate Cupcake with the white piping on top in honor of my colleague Helen who was leaving our office for a new, awesome job in the historic house of her dreams. In thinking about the perfect dessert to honor Helen, who loves chocolate, I wanted something that would represent a down-home, midwestern picture of simplistic joy. This is what Helen exudes and thus, her departing dessert had to be representative of her sparkling personality.
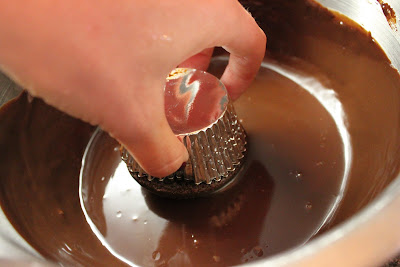
 Before I get to the actual recipe, I must admit that this is a bit of an undertaking. But I promise its a LOT of fun to get into the process and the techniques are pretty simple and versitile. Above you see a sharp knife going into the center of a cupcake. I made an "x" cut all the way down into each cake so the cream filling met less resistance when piped in (below).
This cake is from Smitten Kitchen's Chocolate Peanut Butter Cake, which she adapted from Sky High: Irresistable Triple-Layer Cakes. The batter may give you pause because its so liquidy. I put it into a plastic water pitcher so I could pour it into the cups evenly.
Cake: yield about 26 cupcakes
2 cups all-purpose flour
2 1/2 cups sugar
3/4 cup unsweetened cocoa powder, preferably Dutch process
2 teaspoons baking soda
1 teaspoon salt
1 cup neutral vegetable oil, such as canola, soybean or vegetable blend
1 cup sour cream
1 1/2 cups water
2 tablespoons distilled white vinegar
1 teaspoon vanilla extract
2 eggs
Preheat oven to 350. Sift the flour, sugar, cocoa powder, baking soda, and salt into a large bowl. Whisk to combine them well. Add the oil and sour cream and whisk to blend. Gradually beat in the water. Blend in the vinegar and vanilla. Whisk in the eggs and beat until well blended. Scrape down the sides of the bowl and be sure the batter is well mixed. Pour into cupcake liners. Bake for about 19-22 minutes or until a toothpick comes out clean. Let them cool completely.
While the cakes are baking, make your ganache. This is an AWESOME recipe and very versitile. As you let it cool it comes to a bunch of different textures.
Ganache: yield about 3 cups ganache
12 ounces semi-sweet chocolate chips
2 cups heavy cream
1 tsp corn syrup
*You can double this recipe if you intend to fill and frost a layer cake.
Into a heavy 2 quart saucepan measure the chocolate chips and heavy cream. Stir constantly while the chips melt and the mixture becomes homogenous. Let it come to a mild simmer and continue stirring for about 5-7 minutes to let it thicken, scraping the bottom consistantly. When thick, pour it into a mixing bowl and stir in 1 tsp. corn syrup. Let it cool, giving it a stir every 10 minutes or so in the beginning, and every 30 minutes or so after awhile. The stiring part is key. If you forget, it will cool into a BRICK. Stiring it keeps it light.
For this recipe I used the ganache for a glaze on top (at about the 2.5 hour cooling mark) and then put the fully cooled ganache (about 5 to 6 hours cooled) into a pastry bag to make the swirls you can see on top of some of the cupcakes. You can also use this fully cooled ganache as a smooth frosting that makes great glossy swoops on a birthday cake by letting it cool the full 6 hours and then giving it a good beating with a wooden spoon to put a little air in it before spreading onto a cake.
Filling: yield about 2 cups filling
1 cup heavy cream
1/2 tsp vanilla
1/4 cup confectioner's sugar
Put all ingredients into a clean, dry mixing bowl. Use electric beaters (handheld works best) to whip the cream. When it is VERY stiff, like almost to the point you think it might turn to butter- stop. It has to be very thick to hold up in the cupcake.
*If you can find Rich's non-dairy RichWhip topping at your grocery store ( I couldn't) I recommend trying that. It's already sweetened and holds up well in the cupcake.
White frosting for piping: yield about 1/3 cup
1 cup confectioner's sugar
1 tablespoon milk
1 tablspoon butter, soft and at room temperature
Whip these ingredients with handheld beaters until they come together. You might need a little more or a little less milk to get it to a place where it feels very stable. Put into pastry bag with standard lettering tip.
For assembly:
So after your cupcakes have cooled, stick them in the fridge for an hour or freezer for 30 minutes to firm up because they are soft and fudgy and will fall apart otherwise. Take out of the freezer and use a super sharp knife to make an "X" all the way to the bottom in the center. Wipe the knife clean after each cupcake. Fill with the cream filling by gently inserting a pastry bag with the cream as far down into the cupcake as possible without creating a giant crater. Fill it further than you think is necessary. It WILL plump up the cupcake.
Dip the tops into the cooled ganache that is still liquid-y. I actually gave them two dips into the ganache and refrigerated between dips. The second dip is optional.
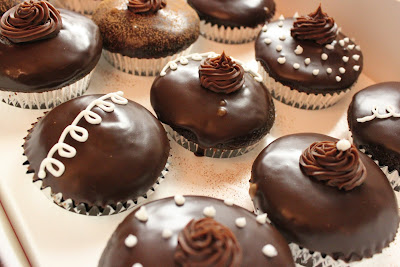
Refrigerate again so the ganache cools and smooths. Some of your cupcakes might still have a crater impression in the center. It's ok: just put more chocolate on them! Decorate as you see fit (see my photos below). I put the completely cooled ganache into a pastry bag with a large tip to make swirls of chocolate over the craters. Pipe the Little Debbie squiggley onto any cupcake that is smooth enough to do so.
I'm completely inspired by the classic, kitschy snacks out there that I want to modernize and purify. I've got BIG PLANS people. There are grand Twinkie dreams in our near future :)
Anybody out there want to invest in my 70's bake shop? You'll get to wear an apron too. Pinkie swear.
I have always loved little debbie.
ReplyDeleteThis comment has been removed by the author.
ReplyDeleteI love little debbie and I love this post. you should start a blog doing recreations of little debbie snacks!
ReplyDelete